DIY: Pulling Up the Carpet On the Stairs…Finally
There are just some projects you put off because you are scared of the “what ifs”. And then you get so tired of it that you think, “Anything is better than this”.
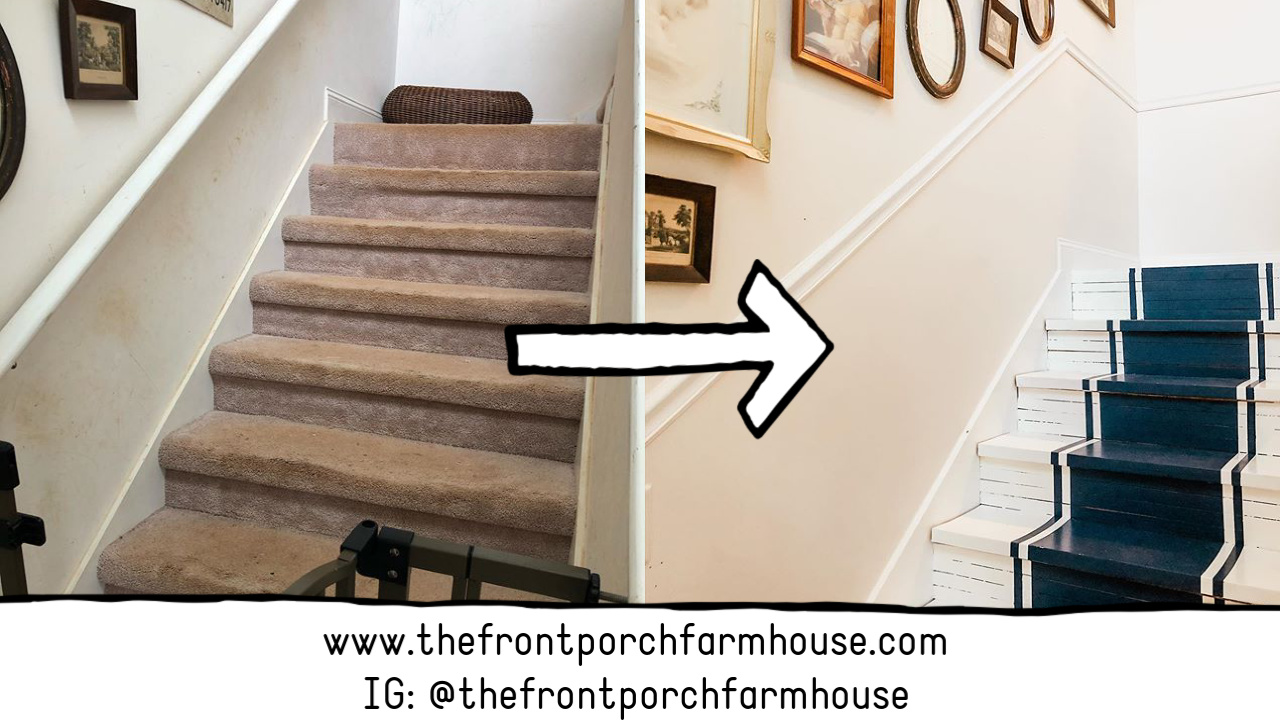
This is the story of our carpeted stairs. Actually, it would be the story of all carpet in our house, but for now, we’ll keep it at stairs. We’ve lived here for over four years and the carpet on the stairs was disgusting. Actually, the entire staircase, walls and all, were a train wreck. There were dirty smudged handprints, crayon markings (Eleanor will never live that down), red mud dust, and who knows what else all over the walls. It was the spot we apologized over when guests came over and said something like, “Don’t look here…it’s next on our to-do list”—except it usually wasn’t. We finally pulled the carpet up at the end of the stairs to take a peek of what was underneath, but couldn’t get a great idea of what we were working with for the entire staircase and so we continued to put it off.

In the meantime, we’d bring the idea up every so often. Could we just paint over the wood underneath? What if it was just plywood all the way up? Would that matter? We would ponder these questions until we finally got to the point where we didn’t care what was under the carpet. Anything would be better than the carpet. And in true Benjamin fashion (that’s my husband), I came home one afternoon to find he had tore the carpet off a couple of steps right smack dab in the middle so we could clearly see what was there.

There was plywood on the risers part and wood on the part where your foot lands (not sure what that’s called??). I felt like I’d need to do something with the plywood part and mulled it over. I finally had an “aha” moment and decided skinny shiplap over the plywood would be very affordable and would look good.
I then focused on colors. Did I want to stain the top part and do the risers white? Did I want to do everything white? What if I went with black on the top? I went to Pinterest and saw navy being used on some steps. Blue is a prominent accent color in my home and I liked the idea of navy. As I continued to scour Pinterest, I saw painted runners and decided that’s what I wanted to do! A navy blue painted runner.
First step: Benjamin pulled up all of the carpet. This was a pretty quick process for us, but it could take longer, depending on the railing and if your builder was staple happy.

Second step: Benjamin sanded down the steps. There were lots of paint spills and grime that needed to come off.

Third step: We used wood lath from Home Depot to create the skinny shiplap effect. Benjamin cut them down and used a nail gun to put them up. This was probably the easiest and fastest part of the project.
We also had a landing spot that was just plywood. We bought planks of wood and put down. After we put all the wood down, we used wood putty on any holes and then sanded again.


Fourth step: We painted the edges of the steps Behr Porch and Floor Paint. We left the middle where the navy blue would go alone. It took three coats of white paint to get the coverage we wanted.

Fifth Step: Let the white paint dry for at least 24 hours and then tape off your runner. We measured from the sides of the stairs, made marks with a pencil and then taped it off. We used Behr Dark Navy for our blue. This was the trickiest and most time consuming part of the project. Mainly because it was nearly impossible to keep the navy from bleeding on the slat/skinny shiplap parts. We tried two different methods and the best way was to tape it off, paint white over it to create a barrier, let it dry, and then go back over it with the navy paint. We still had bleeding with this method too. We just touched it up with white paint on a sponge brush after the navy dried. This was the time consuming part. If you don’t do the runner, you don’t have to worry about this part. And I should mention it took two coats of the paint we used.


Sixth Step: We didn’t do this part and we are now sorry for it because we are going to have to go back and redo parts, but you absolutely want to use a poly to seal it. We didn’t and there are already some places that paint has come off on the edges. Womp, womp, womp.
The last step was repainting the yucky walls. We actually put up some molding so that we wouldn’t have to repaint the two-story walls. I can’t tell you how satisfying it was to see those walls painted!


About The Author
Sharlie
Related Posts

Five Home Decor That Don’t Mix With Kids
I like to feel I’ve conquered the myth that you can’t…
26 May, 2020
How to Remodel Your Kitchen on a Budget
Eeek! First, I’m so happy to be typing a blog post up! It…
26 May, 2020
It all looks gorgeous, Sharlie! You’ve inspired me to add our stairs to our to-do list!
Go for it, Jen! You will be so happy you did! 🙂