DIY Shiplap With Shelf Bedroom Accent Wall
Whew, that title is a doozy! I started dreaming of bedroom accent walls for our room a year or so ago. I went back and forth between shiplap and board and batten. And then I decided I wanted a little color in that room, but not a lot of color. I started looking at Pinterest for inspiration (of course) and I liked parts of a wall, but not the entire thing. I know, I’m complicated. My husband completely agrees.
I didn’t really have to worry about making up my mind because my husband had zero time to work on my random accent wall. Until he quit his job a few weeks ago (you can check that post out here). We had leftover shiplap from the SheShed project (hopefully that will get wrapped up soon so I can blog about THAT). My husband asked me what I wanted to do with the extra shiplap boards.

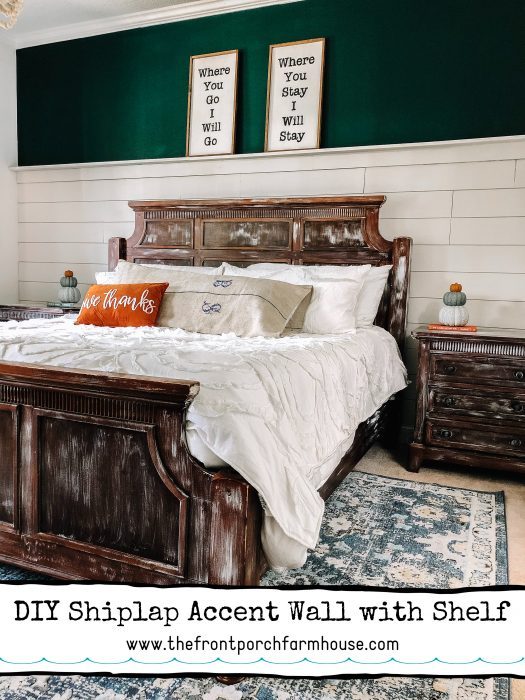
The wheels started turning on that accent wall again. I wanted shiplap on the bottom, a dark green above it, and I wanted a shelf. Yes, a shelf. Benjamin looked at me like I was crazy when I said I wanted a shelf. I change my mind a lot and I liked the idea of having that shelf there so I could change out signs, pictures, whatever…whenever I want without having to worry about holes.
So the faux shiplap went up. We use the super cheap method of buying underlayment. So far, Home Depot has cut it down into six inch strips for us, but I think this can vary from store to store. I currently do not have a blog post specifically on how to do faux shiplap, but you can google and there are lots of posts from other bloggers out there. We use a paint stirrer to space them apart and a nail gun. I painted the shiplap Marshmallow by Sherwin Williams. It’s a nice creamy white…not a bright white.

For the shelf, we used 1×4 boards to go across the shiplap horizontally and then to jut out to make the actual shelf. We used wood putty to fill in the seams and painted it the same Marshmallow.


Finally, I went out to decide what shade of green I wanted for the top part. I went with Breathe Deeply by Valspar.

This was a super easy project that was very cost effective. If we can do it, you can do it! 🙂

From my porch to ours!
XO,
Sharlie
PS: Have you checked out our NEW FAMILY YouTube channel? Click here.
About The Author
Sharlie
Related Posts

Five Home Decor That Don’t Mix With Kids
I like to feel I’ve conquered the myth that you can’t…
13 September, 2019
How to Remodel Your Kitchen on a Budget
Eeek! First, I’m so happy to be typing a blog post up! It…
13 September, 2019
I absolutely love how your accent wall turned out!! My husband and I have been wanting to do the same to our master bedroom for over a year!!
Thank you, Shae! It’s amazing how we put off our spaces until last! 🙂