How to Remodel Your Kitchen on a Budget
Eeek! First, I’m so happy to be typing a blog post up! It’s been way too long! It’s been really difficult for me to do all.the.things since Miller joined our family. We have either been cuddling or chasing him down over the last year! But we just wrapped up a pretty major kitchen refresh, (you might could even call it a remodel), and I can’t wait to tell you all of the details! If you’re looking for ideas on how to remodel your kitchen on a budget, you are in the right place! *high five*
The Old Kitchen


I feel like I have so much backstory to share about our kitchen. We built our house, but we used a builder that had their own floor plans (which we tweaked a bit), but there wasn’t much custom stuff done. I was able to pick out the cabinet colors and granite, but that was about it. Of course, I knew nothing about home decor and what my style preferences were when we built this house, so it wouldn’t have mattered anyway.
After being on IG for a year or so, I decided to do a kitchen refresh by taking the doors off of my kitchen cabinets to give an open shelving look and I put up some peel and stick backsplash. It really changed the vibe of the kitchen for just around $99. You can check that blog post out here, if that sounds more your speed.
Two things really paved the way to make me want to do some more permanent changes to the kitchen. The original layout of our home had a kitchen nook off to the side of our kitchen. When we moved our dining room table to what used to be our living room (head here to read that blog post) it allowed us to think about positioning our kitchen island differently and extend our kitchen into the kitchen nook area. The other thing was I really loved the open shelving look and wanted to take down the upper cabinets and my husband gave the approval that we could finally go ahead with that idea.
Finding The Perfect Kitchen Island
The first thing I had to do was to find the perfect kitchen island. And this is my favorite part. The hunt. I love searching on Marketplace. I love going to vintage markets. And I really love walking into a thrift store…even though I never really find anything. A work table caught my eye on a local picker’s (The Country Pedaler in Taylors, SC if you are local) private FB group. It had character, which is what I look for in every piece I bring in. She had just brought it into her workshop to start working on cleaning it up and people were already interested, but she wasn’t going to list it up for grabs until it was finished. I figured it was a lost cause.
She posted it after she had cleaned it up and people were again still very interested. People asked for dimensions and she posted them. I measured. Hmmm, this could work, I thought. I was sure someone had already scheduled to pick it up and we weren’t quite ready to take on the kitchen anyway. It stayed in the back of my mind though. And then I saw she was having a vintage pickin sale out of her garage and my kitchen island was going to be up for grabs. I’m going, I decided. I wanted to see it in person.
I walked in and had all the heart eyes. After sharing it on my IG stories and I was totally coerced by peer pressure to just go ahead and buy it. Best idea ever! When we brought it home, it was just perfect. I updated the hardware with some handles from Hobby Lobby and found a piece of butcher block from Home Depot that fit it perfectly so we added that on top. I know some people want me to paint it (my husband included), but I love the rustic, messy look! Cost of island $300. I sold my old island on Marketplace for $300 so I consider that to even out. The butcher block was around $300. Hardware was bought on sale for around $50 from Hobby Lobby.
Demo Day!!
I totally think Benjamin agreed to this project because he was going to get his own little demo day of pulling down the upper cabinets. Once they were down, we put up shiplap, painted them with Downy by Sherwin Williams, and then put up the open shelving. I used Early American stain and simple brackets from Lowe’s. I was so happy to have the simple shelves that could hold my essential kitchen tools. Hint: buy white bowls, etc to have a pulled together look. I would estimate the total cost of shiplap to be $250, paint $100, and open shelving was around $60.
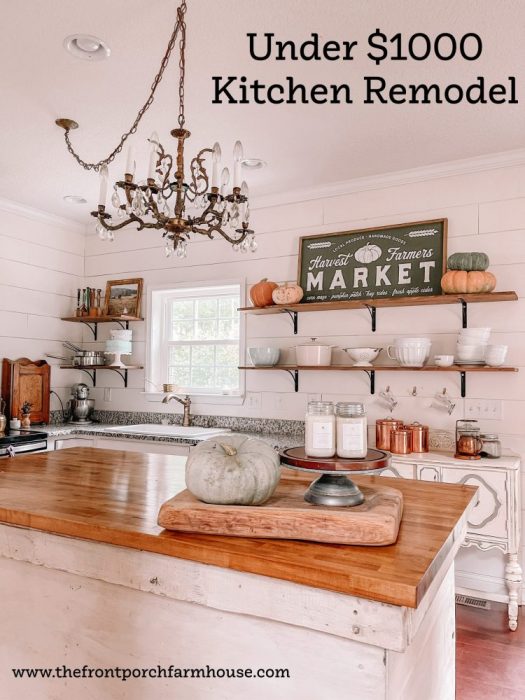
Switching the angle of the island meant I had to do some rearranging of my light fixtures. The original light fixtures were actually recessed lighting that we had converted to pendant lighting. I really, really love the look of an old chandelier in the kitchen so we figured we could make it work to swag it from the kitchen nook to over the island. There was a bit of a problem because the original chain and wire wasn’t long enough. Thank goodness for blog posts! My husband was able to rewire it in an afternoon and up it went!
The Verdict
I’m in love! The kitchen island is so much bigger than our old one and this setup just works so much better for our family! We are waiting for the new oven to come in, but we have no clue when that may be. We will be adding a hood over the oven once it comes in.
This autumn market sign from Teal Barn Signs makes such a statement! Use code FRONTPORCH15 to get 15% off your order!


About The Author
Sharlie
Related Posts

Five Home Decor That Don’t Mix With Kids
I like to feel I’ve conquered the myth that you can’t…
11 September, 2021
What Color Pumpkins Should You Use?
I have a lot of pumpkins. Like, more than any normal person should have. Part…
11 September, 2021